


Hvordan "basher" man bedst?
2 deltagere
Side 1 af 1

Hvordan "basher" man bedst?
Gæst Tirs Nov 18, 2008 7:00 pm
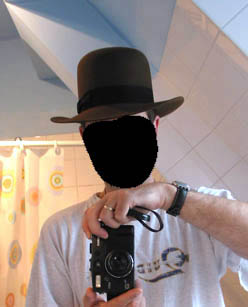
Ja, spørgsmålet ligger i overskriften. Jeg har lige modtaget en af AB's "The Henry" med posten  . Den kom selvfølgelig "open crown", og nu mangler jeg så en god guide eller nogle hints til hvordan man gør den slags bedst. Nogen forslag?
VH
Emiliussen
VH
Emiliussen

Gæst- Gæst
Sv: Hvordan "basher" man bedst?
Ace Fre Nov 21, 2008 12:17 pm
Her er lige vejledningen som Marc har henvist os til.
Beklager at den ikke er blevet oversat endnu.
How To Put a Raiders Style Crease or Bash on Your Fedora

Beklager at den ikke er blevet oversat endnu.
How To Put a Raiders Style Crease or Bash on Your Fedora
"Bashing a hat is actually very easy. I've bashed all my hats and now it quite literally takes me 5 minutes. Having said that, you shouldn't aim to have the bash finished and fixed forever at the first try. For this reason I don't advocate the use of clothes pegs to hold the creases. The creases will become fixed through use.
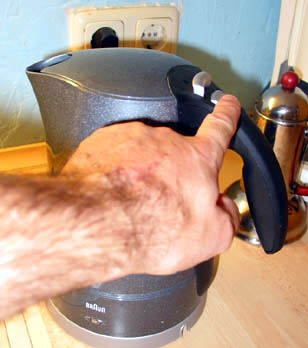
Here we go: You will need the following - an open crown hat of your choice, 1 or more mirrors in different rooms, a kettle.
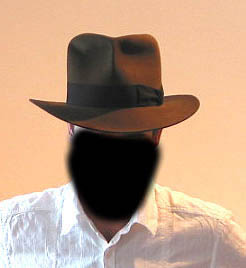
As this tutorial is aimed at getting the Raiders look, you will need a fedora with a decent block shape. It should look like this:

STEP 1.
Put the hat on your head (see if it fits!!). This will be a Raiders hat so you need to look in the mirror and turn the hat towards your right until you are happy with the brim shape. Note - this is the ONLY thing that I do to the brim!!
STEP 2.
Fill the kettle with water and turn it on. We will need it later.
STEP 3.
Still looking in the mirror, start pushing down a center dent. It doesn't have to be perfect or even deep enough, just enough so that you can see where it is when you take of the hat.
STEP 4.
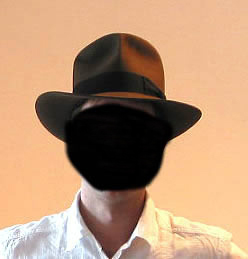
Take the hat off and work the center dent a bit. It should look like this. You may notice those tell-tale "pork pie" creases that have led many an expert astray.
STEP 5.
Ignoring the "pork pie" creases, take your hat by the front and pinch in the side bashes. I like a bash to look natural so just let the hat conform to your hand squeezing it - the side dents will form themselves.
STEP 6.
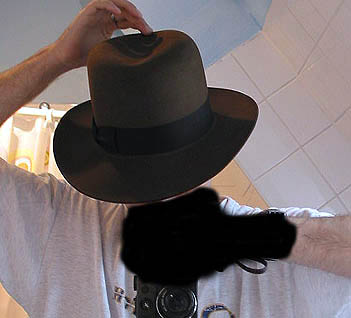
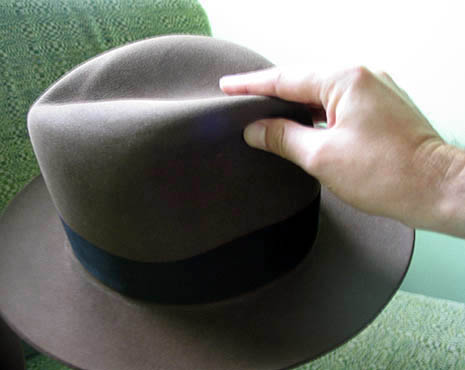
Now I deepen and define the right side dent. The red lines should indicate where my thumb and fingers squeeze the dent from the inside while I bend the felt around my thumb using my other hand from the outside.

I don't do much to the left side dent - I rather let it form itself, but you can give it some form if it needs it.
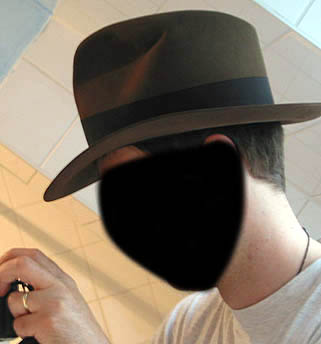
The result is a nice curved dent like this. Viewed from the front, this helps to get that Raiders "boxy" look.

This is an example of what I mean by "boxy"

STEP 7.
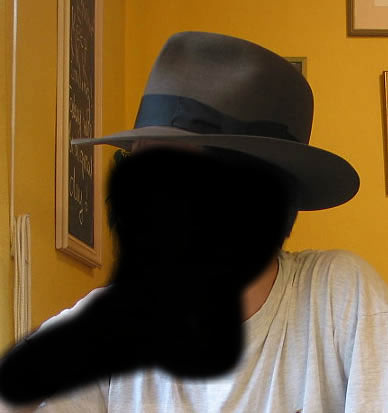
Put your hat on your head and return to the mirror. Check that your dents are looking deep enough and that your hat is getting an "angular look". The reason I mentioned needing one or more mirrors is that you need to check the shadows of your bash - try to view yourself under different lighting to get a better impression of your hat bash.

STEP 8.
Check your side profile. Does your center dent need lowering at the back? Is it deep enough?
Take off your hat and look at it under good lighting - do you have a deep and long center dent? Think of Indy tapping the floor tiles in the temple!!"
Here we go: You will need the following - an open crown hat of your choice, 1 or more mirrors in different rooms, a kettle.
As this tutorial is aimed at getting the Raiders look, you will need a fedora with a decent block shape. It should look like this:
STEP 1.
Put the hat on your head (see if it fits!!). This will be a Raiders hat so you need to look in the mirror and turn the hat towards your right until you are happy with the brim shape. Note - this is the ONLY thing that I do to the brim!!
STEP 2.
Fill the kettle with water and turn it on. We will need it later.
STEP 3.
Still looking in the mirror, start pushing down a center dent. It doesn't have to be perfect or even deep enough, just enough so that you can see where it is when you take of the hat.
STEP 4.
Take the hat off and work the center dent a bit. It should look like this. You may notice those tell-tale "pork pie" creases that have led many an expert astray.
STEP 5.
Ignoring the "pork pie" creases, take your hat by the front and pinch in the side bashes. I like a bash to look natural so just let the hat conform to your hand squeezing it - the side dents will form themselves.
STEP 6.
Now I deepen and define the right side dent. The red lines should indicate where my thumb and fingers squeeze the dent from the inside while I bend the felt around my thumb using my other hand from the outside.
I don't do much to the left side dent - I rather let it form itself, but you can give it some form if it needs it.
The result is a nice curved dent like this. Viewed from the front, this helps to get that Raiders "boxy" look.
This is an example of what I mean by "boxy"
STEP 7.
Put your hat on your head and return to the mirror. Check that your dents are looking deep enough and that your hat is getting an "angular look". The reason I mentioned needing one or more mirrors is that you need to check the shadows of your bash - try to view yourself under different lighting to get a better impression of your hat bash.
STEP 8.
Check your side profile. Does your center dent need lowering at the back? Is it deep enough?
Take off your hat and look at it under good lighting - do you have a deep and long center dent? Think of Indy tapping the floor tiles in the temple!!"
STEP 9.
By the now the kettle has boiled. Pour yourself a hot beverage and enjoy your hat!!!!
Personally I don't advocate the use of steam for bashing. If you have a rabbit felt that is really VERY unresponsive, you might try a little steam, but a little water is probably a safer bet. If you find the bash doesn't hold "permanently" at once - don't worry, you can pinch and re-squeeze the dents each time you put your hat on. The bash will soon become fixed and will look more natural.
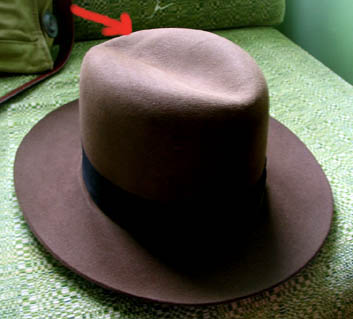
One more word of advice- I don't really crease the whole bash). The picture below shows the areas that I pinch tightly. (Blue)
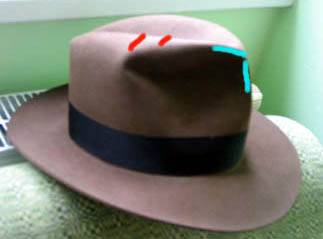
The red lines show where I like to leave the felt round and opened (for want of a better description).
By doing so you achieve the following: When you tip your head further back (or your hat), you get a more angular look based on the lines of the side dents. When you tip your head (or hat) forward you get camel humps. The camel humps don't need to be formed as such - they are just the natural rounding of the top of the crown.
So, looking at these pics, I can see that the bash isn't perfectly defined yet. In a day or so of putting on /taking off - it'll look just right.
www.indylounge.com
By the now the kettle has boiled. Pour yourself a hot beverage and enjoy your hat!!!!
Personally I don't advocate the use of steam for bashing. If you have a rabbit felt that is really VERY unresponsive, you might try a little steam, but a little water is probably a safer bet. If you find the bash doesn't hold "permanently" at once - don't worry, you can pinch and re-squeeze the dents each time you put your hat on. The bash will soon become fixed and will look more natural.
One more word of advice- I don't really crease the whole bash). The picture below shows the areas that I pinch tightly. (Blue)
The red lines show where I like to leave the felt round and opened (for want of a better description).
By doing so you achieve the following: When you tip your head further back (or your hat), you get a more angular look based on the lines of the side dents. When you tip your head (or hat) forward you get camel humps. The camel humps don't need to be formed as such - they are just the natural rounding of the top of the crown.
So, looking at these pics, I can see that the bash isn't perfectly defined yet. In a day or so of putting on /taking off - it'll look just right.
www.indylounge.com

Ace- Admin
- Antal indlæg : 999
Fødselsdag : 27/02/76
Alder : 48
Lokation : Videbæk, Danmark
Tilmeldt d. : 30/09/07
Sv: Hvordan "basher" man bedst?
Gæst Fre Nov 21, 2008 1:24 pm
Ja, det er en udemærket guide. Vær dog obs på "Step 6"! Man skal have en hånd IND i hatten - det fattede jeg altså ikke lige med det første - man kan næsten heller ikke se på billedet, at det faktisk er det han gør...
Gæst- Gæst
Sv: Hvordan "basher" man bedst?
Ace Fre Nov 21, 2008 11:11 pm
Skal vi snart se dig i gear Emiliusen ?
Jeg er spændt på at se hvordan "The Henry" ser ud som kotcs hat.
Jeg er spændt på at se hvordan "The Henry" ser ud som kotcs hat.
Ace- Admin
- Antal indlæg : 999
Fødselsdag : 27/02/76
Alder : 48
Lokation : Videbæk, Danmark
Tilmeldt d. : 30/09/07
Sv: Hvordan "basher" man bedst?
Kredepops Ons Aug 19, 2009 7:27 pm
God video af Penman som også sælger 'The Henry' om hvordan man basher sin hat.
https://www.youtube.com/watch?v=ozJKQVCgeZ4
https://www.youtube.com/watch?v=ozJKQVCgeZ4

Kredepops- Antal indlæg : 279
Fødselsdag : 29/10/79
Alder : 44
Lokation : Danmark
Tilmeldt d. : 22/05/08 -

» "Spoiler" Vanity fair Indiana Jones 4 report "
» Label til "Belle Of Lincoln" Whiskey flaske fra R
» Label til "Belle Of Lincoln" Whiskey flaske fra R
Side 1 af 1
Forumtilladelser:
Du kan ikke besvare indlæg i dette forum|
|
|
» Skurke & Helte-Fest 2014
» Er der nogen...?
» Skurke & helte-fest 2013
» Star Wars Celebration Europe II
» SKURKE & HELTE-FEST 2012 - invitation
» Velkommen til 501st. legion
» Helte / skurke fest 3!
» Fuglsang søger udklædte til to begivenheder